Yes, it takes a little bit longer...two days to do this tip, but I'm thinkin' you might forgive me?!!
I decided to call this colorful delight "Spring Dreams" Pincushion since, if you live anywhere where you are getting slammed with the cold and snow like me, you are definitely dreamin' of Spring, right?!!! You can download the PDF drawings
here.
So, we will pretend this is going to be the very first time you ever attempted to do a wool/wool felt project just in case we ever get a newbee here that is debating whether this is too scary for them to attempt. It is NOT!
It is really very EASY!
1. First, and foremost, if you have directions from a pattern...
ALWAYS read your instructions all the way through! This is so important for obvious reasons, such as, needing to know something integral to your project before starting any drawing, cutting or gluing, etc.!
2. Gather all supplies! For this project you will need...freezer paper, lead pencil, common pins, paper-cutting scissors, iron, glue baste (I love Roxanne's) embroidery scissors, crewel or embroidery needle (I prefer size 2 crewel needle), embroidery thread (I used Sulky Blendables 12 wt #4102 light pastel blend, #4016 green/blue blend), 18 yellow mini brads, 19 purple mini brads, for the filler I used lavender scented ground nut shells, and finally, wool or wool felt in the following colors...
- light blue: 8" x 14-1/2" to cut two 3-3/4" x 5" ovals and one 14-1/2" x 2" rectangle
- darker blue: 3" x 3" to cut 2 bluebird bodies and wings
- green: 3" x 3" to cut four leaves
- light pink: 3" x 3" to cut 6 flowers
- medium pink: 3" x 3" to cut 8 flowers
- dark pink: 3" x 3" to cut 6 flowers
- yellow: 3" x 3" to cut 6 slightly smaller flowers
- white: one picket fence 8-1/2" x 1-1/2" rectangle
(For those who have never done this before, freezer paper can be purchased on a huge roll at your local large grocery store where the plastic rap is found. I also carry it on my website in a package of twenty five 8-1/2" x 11"sheets that can be safely used in an ink jet printer.) The rest of the items following are also sold on my website and are some of my favorites.


3. Carefully trace all shapes needed onto freezer paper with your lead pencil (shiny side down). Cut all pieces out just outside the trace line (about 1/16"). Place each of the shapes on the appropriate color wool/wool felt, again, shiny side down. Set your iron on high and gently iron paper shapes onto wool/wool felt only until they stick. About 5/6 seconds each piece. Let cool. Now, cut shapes out directly on the pencil line. Gently peel the freezer paper off and you have your perfect little shapes to play with! Here is a link to a very good tutorial to show you how to use freezer paper if you are a visual peep like me...
click here!
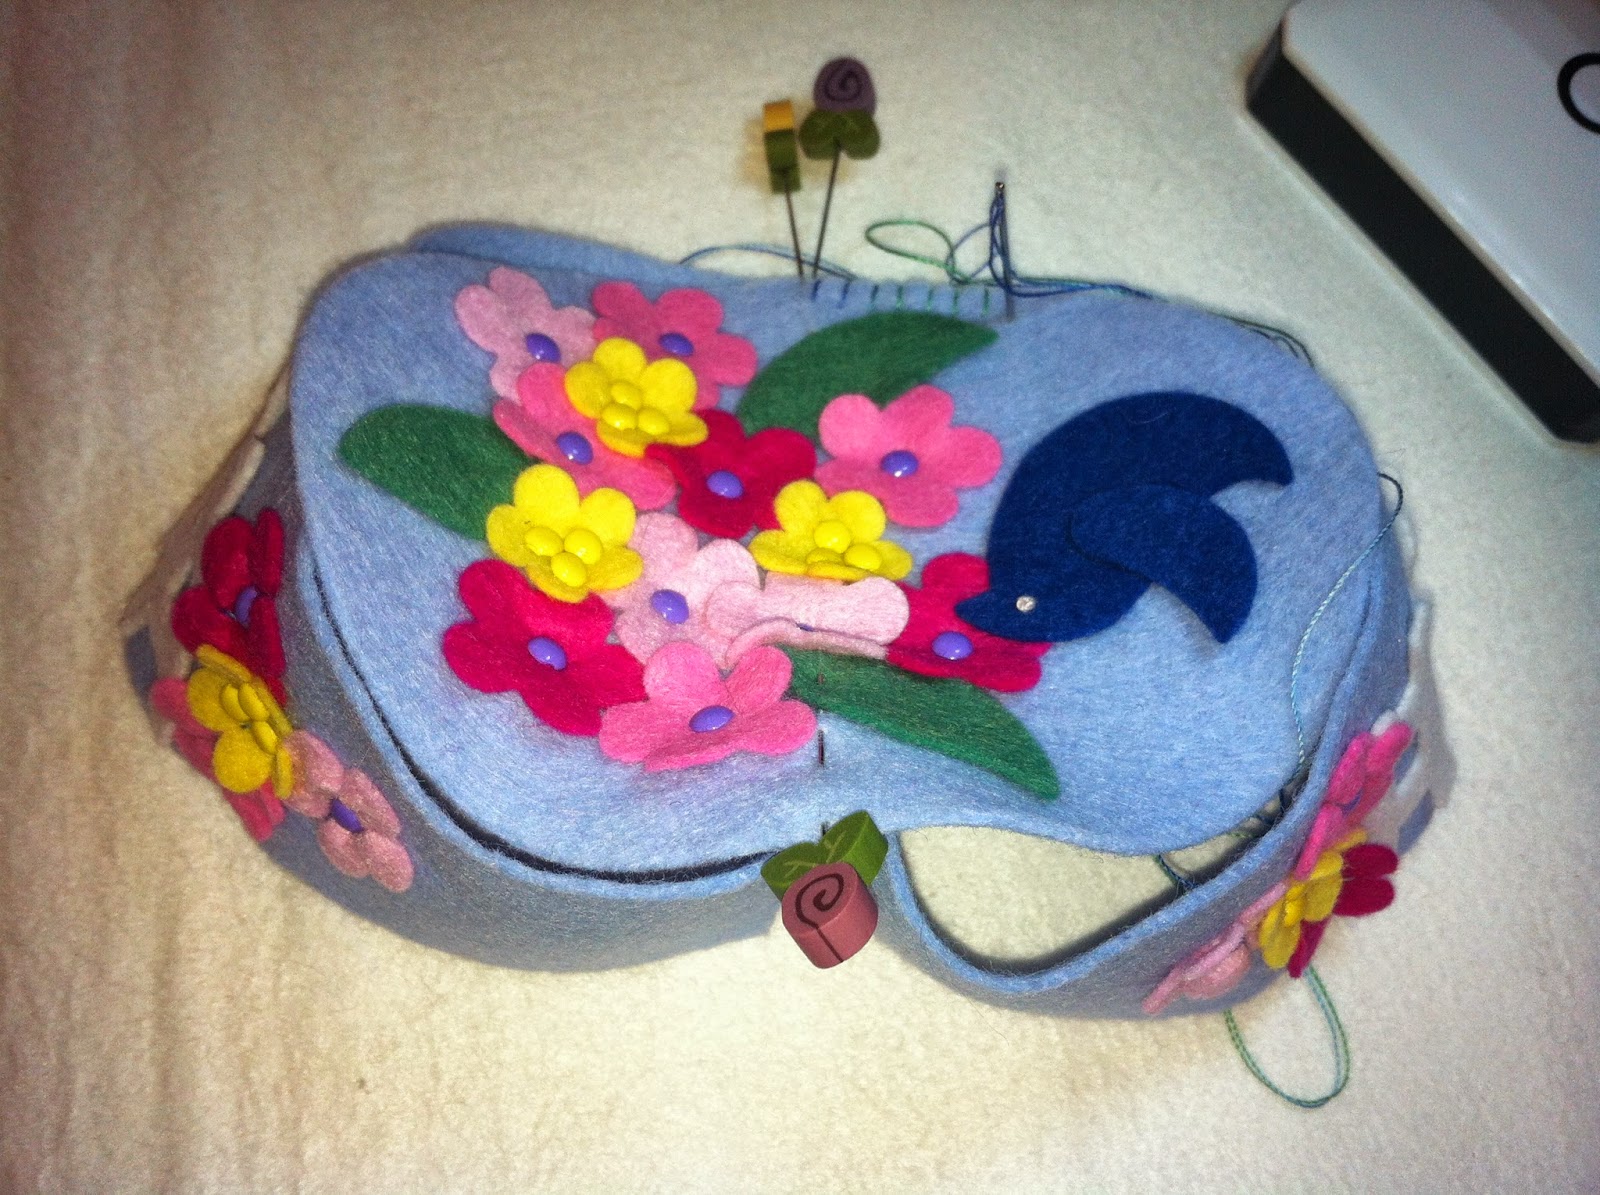
4. Arrange all your pieces, according to the photo, on the pincushions light blue oval top. Dot glue in place, leaving enough space from the edges to eventually place your blanket stitch around the edge. To find the exact center of the fence and your 14-1/2" x 2" rectangle piece, fold each in half, mark with a common pin and match up. Dot glue fence in place. Arrange the rest of your pieces onto the light blue 14-1/2" x 2" rectangle as in photo and dot glue in place. There are 2 birds but the second bird does not get attached until near the very end so just put him aside for now.
 |
| If you click on this photo to enlarge, you can see that you really do only need dots of glue, at least with my favorite Roxanne's Glue Baste. Just dot, press and in a few minutes it adheres. Love it! |
5. With the tip of your embroidery scissors, carefully poke a hole (yellow flowers get 3 holes each) in the center of each flower all the way through to the back of the light blue oval and long blue rectangle. Place either one purple or 3 yellow round mini brads in each, according to the photo. Spread the metal prongs open on the back of each to secure in place.
6. Using your green/blue thread, form a tiny whip stitch around the bird body and wing and around each leaf. Back stitch the center lines and veins in each of the 4 leaves. To stitch the flowers and make them look a little more 3-demensional, come up from the back, as close to the mini brad as possible. Go back down directly underneath the petal where the V shape is and again as close to the brad underneath. When you tug a little tight, it will pull the petal in a bit and give it a little more dimension. Continue this on all the flowers.
 |
| The two Sulky 12 wt threads and mini brads I used on this pincushion, pre-cut wool felt pieces, as well as, the lavender crushed walnuts can now be purchased separately for this kit on my website under the pincushion link just in case you don't have time to trace and cut it all or run around for all supplies to make this Spring Dream Pincushion. |
 |
| Pull thread somewhat taut to give petals a little added dimension. |
|
|
|
|
|
 |
| Just a couple of photos to show how my tiny whip stitch is formed. |
7. The bluebird get one French knot for each eye with the pastel blend thread, wrapping the thread around the needle 3 times to form your French knot. I wrapped 6 times but on hind sight I think my bird eyes look to big. Yes, 3 times works perfect! You will do the same stitching on the other bluebird when ready. Using the same thread, form a running stitch through the center of the fence as in photo. If you click on the
above photo (or any of the photos), it will come larger so you can see the fence stitching a bit better.
8. Fold the embroidered oval top in half lengthwise and mark with a common pin on both top and bottom. Fold the embroidered picket fence piece in half and mark the center above the flowers with a pin. Line that those pins up and that is where you will start to sew together with a blanket stitch using the green/blue thread. You will lining up the edges, a small portion at a time (like 1/4") as you sew around until you get to where the other pin on the oval is. Stop and knot. Then continue from where you began on the top and blanket stitch in the opposite direction until it meets in the back.
 |
| By the way, my common pins have flower heads on them, just so you don't get confused. |
 |
| I flipped the oval over so the bottom is now on the top and started my blanket stitch by hiding my knot first. |
 |
| Then turned it back over, |
 |
| lined up my flower pins to match the centers |
 |
| and came straight down to start my first stitch, leaving my thread up so that when I put the needle through |
 |
| I have already formed a loop with my thread and now I just pull my needle straight up, against the fabric so my stitch comes out nice and straight, as well. |
|
|
|
 |
| Then, I continue on with my blanket stitch while I keep making sure the wool felt edges are staying lined up. |
 |
| As you can see, I prefer doing my blanket stitch from left to right. For me it goes much faster and my stitches come out more even. It seems to take less effort forming my stitches, though most lessons teach you the opposite direction. |
9. Fold excess of the picket fence rectangle toward the inside of the pincushion and backstitch closed with rather small stitches to enforce. Now you are ready to glue in place the other bluebird right over that seam. Embroidery her as you did the other.
10. Place the remaining blue oval, fold in half lengthwise to mark the center with common pins and line up with the picket fence piece. Blanket stitch, starting from the back seam, and around, stopping approximately an inch or so from finishing. Pour your crushed walnuts in to fill to the brim, as much as possible and blanket stitch until closed. Knot, hide your thread and VIOLA'!!!! You are ready for sewing your Spring projects!!!! Enjoy and, as always,...
HAPPY STITCHING!!!
C'MON SPRING!!!
* If you would like to purchase the pre-cut wool felt kit (including bag of lavender scented crushed walnuts) it is be available on my website. The coordinating Sulky Blendable 12 wt. thread kit including yellow and purple mini rounds is also be available there. *